Rejection Proof Patent Illustrations: 10 ways to Ensure – Webinar
More details about this Webinar
The patent application is imperfect without patent illustrations.
The importance of patent illustrations and the pain of getting rejections from the examiner are in this topic.
We have discussed the checklist that covers the key points of “INVITATION TO CORRECT DEFECTS” to make you ahead of any patent illustrations rejections.
Webinar Transcript
Nick Martin: Hi, I welcome everyone. My name is Nick Martin, Senior Executive of the Insight sales team from the Indian Headquarters. Welcoming you all on our webinar today on the topic Rejection-proof patent illustrations: 10 ways to ensure.
First, I hope you and your families, friends, loved ones, neighbourhoods are healthy and safe. These are difficult and unprecedented times for all of us and we wish things get back to normal soon. As this is the new way of life, working from home, many people who may be called working remotely or are experiencing some challenges with the network will be asked for your patience.
So, here are a few recursive things that I would like to share. Today’s Webinar is for 60 minutes, and includes a session of question and answers at the end of program. However, you may ask questions at any time by clicking the questions section on the Webinar Control Panel, and we do our best to answer them at the end of the presentation. Also, please feel free to contact us after the webinar if that’s an easier way.
Before I go on to introduce the topic and reputable speakers on our session today, I am pretty feel delightful to welcome the participants from major countries like United States, Egypt, Spain and I see people are joining from Asian-Pacific countries as well like Australia and New Zealand. This is great and I must mention that your participation is wonderful encouragement to the efforts and agent to share our experiences that we are making to raise awareness and knowledge that we have at Sagacious over more than a decade working with inventors, R&D organizations, IP departments and IP run practices, it experts on both.
For today’s session of a task with an objective to consolidate and share Rejection-proof patent illustrations: 10 ways to ensure. Our first speaker of the session is Hemant Kumar, and he’s a senior manager of illustration team at Sagacious with more than 10 years of experience with the patent industry, with an expertise in the patent illustration domain. Welcome to the webinar Hemant.
Hemant Kumar: Thanks Nick, thanks for having me on the webinar. It’s a great pleasure to be here.
Nick: Thank you Hemant, it is my pleasure indeed to have you as a lead speaker for today’s program. Now, our second speaker of the session is Ankur Sharma. He’s a senior patent illustrator at Sagacious with more than three years of experience in the patent industry, again with expertise in patent domain. Welcome to the webinar Ankur.
Ankur Sharma: Hey, Nick. Thanks for having me on the webinar. Pleasure being here.
Initial Remarks of Speakers
Nick: Thank you, Ankur. It’s my pleasure indeed to have you on board as speaker for today’s program. So, before we start off with the presentations today, let me ask our speakers for the initial remarks on today’s topic.
So, Hemant and Ankur based on my experience, I can say that professional formal patent illustrations are essential in any application or I can rephrase that patent application is imperfect, without the patent illustrations. And we always see that IT professionals have increased pressure to broaden the scope of an invention and it is the best way to broaden the scope through multiple detailed and professional drawings. Let’s start with it, what he has to say about that.
Hemant: Thank you, Nick. I agree that the patent illustrations are really important for any patent application. And in today’s webinar as well be covering the importance of the patent illustrations and the basic guidelines to help the community to avoid simple restrictions. And the reason as why we are covering this topic is because after working on more than 10000+ drawings, I can still see that the patent application are getting rejections on drawings due to avoidable missteps in the initial stages.
The topic will not only help the audience to create the checklist but will also help them to stay ahead of the patent rejections.
Nick: Alright, thank you Hemant. Let me now ask Ankur what his initial comments are on this topic today.
Ankur: Thank you, Nick and Hemant. In addition to what Hemant mentioned, we’ll also get to know how these points to prevent rejection, can be recognized in an office action. We’ll be taking an example of a PCT invitation form to correct defects in the international application, and will understand the common points of rejection that are considered globally by different judiciaries.
We will learn about the basic format of an office action and white drawings other than all other documents make it easier to respond to an Office action. So, we’ll mostly be keeping the discussion around the importance of drawings, their effects and how can we avoid any office objection with the help of a professional approach, often illustrator.
Nick: Thanks, Thank you Hemant and Ankur for benchmarking the initial context of today’s session that really was an insightful one. But see, that the importance of patent illustrations and pain of getting rejections from the examiner will be covered in this topic. We will also discuss the checklist that covers key points of invitation to correct defects to make ahead of patent illustrations rejection.
Before we move ahead with the main presentation, I invite our listeners to keep sharing their questions, as a habit during decision using the GoToWebinar question box on the right side of the presentation window. I will be monitoring those questions and asking the panelist to address those during this session.
One major announcement that I would like to make is, Sagacious team is offering up to four drawings at no cost to the attendees. The offer is valid for single and initial request only. The participants of this webinar can drop us an e-mail later at webinar@sagaciousresearch.com and we will share it with them. So, let’s get started with the main part of our program and for that, let me invite Hemant to take the lead from here and further enrich the session. Over to you, Hemant.
Hemant: Thank you Nick. Let me now walk through the presentation and elaborate. Why are patent illustrations important?
Why are patent illustrations important?
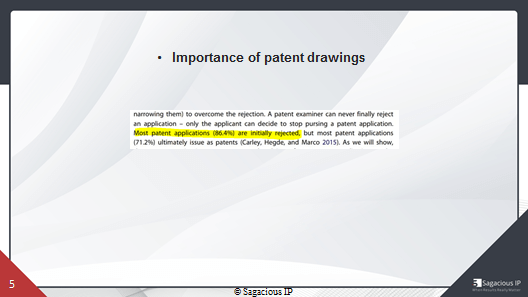
So, as we know, that the patent illustrations are important and play crucial role in patent application. But unfortunately, most of the patent application, almost 86.4%, get the rejection in the initial stage, then there are certain other issues, including default in drawings, which is the most ignored part of the part of the patent application.
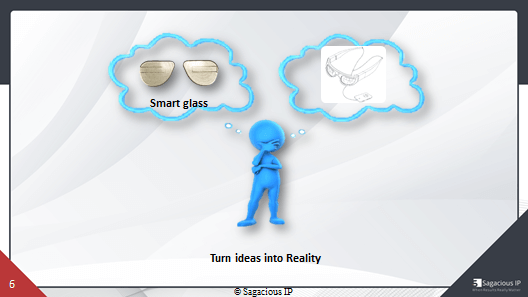
The patent application is also interfered without having the formal drawings and the purpose of adding drawing in patent application is to create a visual appearance of the invention because a description of the invention alone cannot create an actual understanding. The patent illustrations can be considered as a secondary language that helps the potential and the society to get the actual picture of the invention.
So, let us see in a case study, and let us see how an office action received. So, there was a client who filed a patent application and included images directly instead of including formal ones. Later, for obvious reasons, he received an office action due to not following the guidelines laid for the patent illustrations. Now, let us have a look at final drawings in response to the Office Action. So, will you be able to understand the product described above, most likely not, this is where the patent illustration work. This not only helps the inventor but also helps the examiner to understand the invention. And, as per the PQ guidelines, drawings should be included, wherever applicable.
Nick: That was quite comprehensive and I totally understand as why patent drawings are important in an application, detailed drawings are indeed one thousand words and this could be true because if accidentally we leave something out of the written disclosure, a drawing that we submit save us in the long run, provided, it is detailed enough to convey the newest information about the invention because the detail of the patent illustrations is what saves us.
So, having a professional patent illustrator would be a quite wise decision. But what about the formatting? Are there any specific guidelines by universe patent laws, regarding sheet size, marginal areas and, if yes, what should be the size of those drawings?
Formatting of Patent Drawings
Hemant: Yes Nick, but before moving forward, we lead on the stand that every nation has its own patent guidelines which will be taken care of before submitting the formal drawings. The applicant should consult the professional before filing to appropriate authorities of any nation.
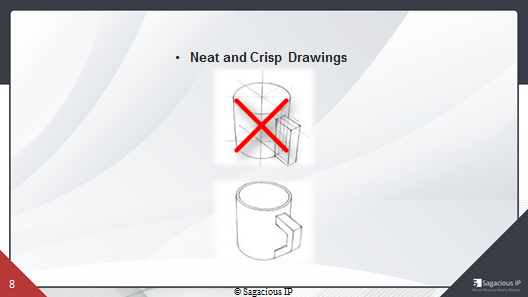
A note for everyone, the format and the guidelines that are going to be discussed are universal throughout most of the countries. However, these are the most ignored and overlooked as well. So, let us start with the basic guidelines. Neat and Crisp drawings (Fig.1), so, the former drawings should be neat, clear and should not include any overlays, see the example here, this kind of disruption in their drawings will lead to an office action for sure. Now, let us have example, at the neat and clear drawing to pass one of the requirements of the Patent Office. The drawing is neat, clear and doesn’t need too many olds.
Size of Sheet
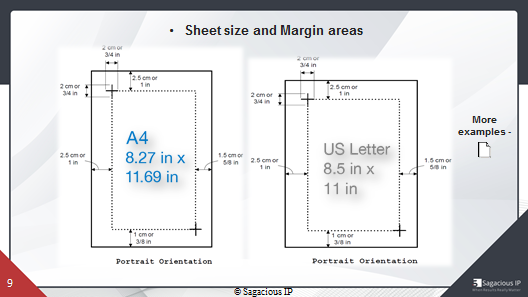
Now, let us talk about the other guideline, which is very much important, and we cover all the sheet size and the marginal areas. So let us take an example of the USPTO guidelines here. So, there are two sizes which are permitted, one of them is A4 and the second one is the letter size.
Now, let us see the margins area of A4 sheets which are very important and usually create objections, if not followed properly. So, as we can see, the black solid lines of the rectangle are the edges of the A4 sheet and the rectangle made up of dots in the area to be used to place the formal drawings. We need to be very careful to not to cross the marginal area at the set scale and will lead to an Office action. Again, a remark here for everyone, that doted lines and the measurements are just for illustration purposes only and should not be included in the final draft.
So, now let us see and see the marginal areas of the US letter size. So, as we all can see, the margins are basically the same as the A4 sheet size. Now, let us identify, which one is better, should we go with a A4 or letter size? It is more convenient to go with the A4 letter size, as it is the acceptable size in the international filing as well, but make sure to keep the size sheet same within the patent application.
So, let us check few more examples to know why A4 is the universal size. So, as we can see, that we have compiled a list of the countries where we can see that most of the rules have A4 sheet size. We have here Algeria, we have Argentina, we have Australia, we have Austria, we have Canada, we have China, we have Finland, France, Germany, India, Japan, Korea, New Zealand, PCT which is very important and we have US as well. So, as you can see why a full-sized size is basically universal in size. I hope Nick, the basics of the format is clear now.
Nick: Yes, thank you Hemant for a much descriptive explanation on this topic and I see, it is quite clear that the patent applicant is required to furnish patent illustrations and it is required by the patent application tools to be in a particular form specifying the sheet size on which drawings are made, the type of paper used, the marginal requirements and many other hyper-technical details relating to the making of those drawings.
However, one of the concerns, coming to my mind and for audience as well, should these drawings be the colour images or the black and white figures? Is there any particular guideline regarding that?
Type of Photographs
Hemant: Yes, Nick. So, let us discuss this in a brief. So, starting with the photocopies and photographs first. So, we need to understand that not all the patent officers permit photographs to be used instead of black and white line drawings. However, there are some jurisdictions such as USPTO, PCT WIPO, India’s and many more where photographs are permitted to use on rare occasions only.
The photographs can be used, if it is the only practical medium to disclose the invention. For example, the same can be used for the cell diagrams, for the plants, for the vivo images and for the micro-organisms, et cetera, as they cannot be achieved by line drawings. Further, there are two types of photographs that should be considered, one is colour and the another one is grey.
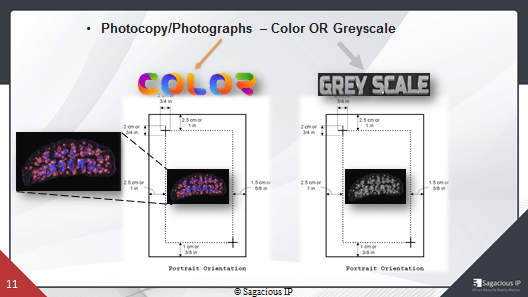
Now, the question arise what type should we consider? As a pace, the type of the photograph to be used should quantify the guidelines of the PTO offices. Let me explain this with an example here, so the USPTO allows colored drawings for rare occasions, however, the same color photographs are not permitted in PCT WIPO. So, for PCT WIPO, we have to use the same photograph but in the grey shade, as you can see here in the example.
So, this is where the professional approach comes in handy to fulfill the other aspect of the guidelines as per the PTO requirement. A professional would be able to handle all the complexity of these guidelines.
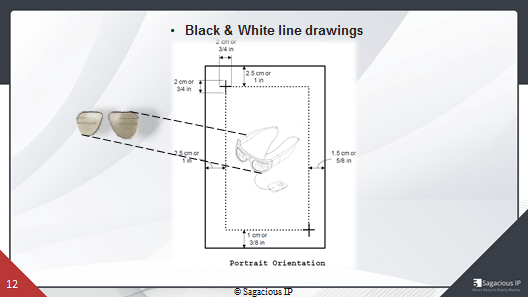
Black & White Line Drawings
Now, let us jump to the favourite part, which is black and white line drawings. So, the black and white line drawings, as we know are the most referable format and accepted by the almost every PT offices. So Nick, I hope that we have a thorough understanding to see through the right approach based on the requirement.
Nick: Indeed; thank you , Hemant. So, what I understood is that colored photographs would work in some cases, where line drawings cannot be prepared like in the cases of cell diagrams, plants, vivo images or the micro-organisms , but the type of photographs should quantify the guidelines of the patent office of individual.
Nevertheless, using black and white line drawings are preferred the most and accepted by almost all patent offices. There is always a case of exception, but ideally Sagacious is well-versed with the patent laws of individual countries. Do we also have some criteria for introducing text in the formal drawings or I can rephrase, can I reduce the size of those text in the drawings?
Size of Text in Drawings
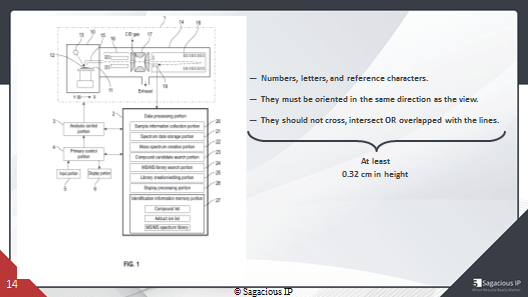
Hemant: Thanks, Nick. This is indeed a nice question and yet another important guidelines to keep in mind while preparing formal drawings. So basically, a formal drawing contain several contexts, for example, numbers, letters and reference characters. The guidelines for these characters are basically universal. So, the content should be uniform in style and size. This should not be oriented. I mean, they should be oriented in the same direction as the view and should not cross each other, should not overlap with any object to maintain the sanity of the drawings.
The most important aspect, which leads to an office action is the size of the height of the font, which has to be at least 0.32 centimetre. As this is an important point I would like to cite again, the important aspect is the height of the text size, which should not be or which should be at least 0.32 centimetre. Any context less than 0.32 centimetre size is not permitted.
Individual views and their numberings
And yet, another aspect that I believe should be taken care of during the drafting process is the arrangement of the individual views and their numberings, which I would like to walk through in my next slide. So, as you can see, that we have a couple of lists which have multiple views.

So, before going forward to the views, we need to understand that set of the formal drawings or the patent application should include as many as necessary views required to show the inventions. The list covers all the important views, which can be used for design patent application, especially all these seven, from the top which are basically the standard requirement for design patent application and for utility, all the views from the list can be considered.
After placing all the views, the views should be numbered in Arabic numbers in continuation from the number one. For example, for drawing one, it should be marked as Fig.1, for the next time it should be marked as Fig.2 and for the third one, for the third drawing, it should be marked as Fig.3 and so on. As appraised all the contacts should be in the same direction and must be 0.32 cm in height.
Again, this is very much important to know that the height of the text should be 0.32, it should not be less than, otherwise, the applicant, will get the office action. So, I hope Nick that it’s under the first part of this session. I hope the audience found this piece of information insightful. Over to you Nick.
Nick: Thanks, Hemant. Thank you so much for your comprehensive coverage and the explanation that you provided. This helped me in realizing the importance of following patent illustrations and hiring a professional patent illustrator for the same. He should be technically sound with the patent laws of the respective country.
I also note a good number of questions from our audience for you at this point , which you may take at the end of this session. I request their audience to keep sharing their thoughts using this webinar chat window.
Let me now ask Ankur to walk us through the second part of this topic. So, for all the points we have covered till now, we are talking of the rejections on the patent illustrations. Is it possible for you to showcase us a live example of an Office action as how it actually looks like and are there any annotations to identify the exact cause of receiving an office action on patent illustrations?
Cause of Receiving an Office Action with example
Ankur: Thanks, Nick. Yes, we’ll have a live example through PCT form, which will make us understand how these rejection points will look in a rejection form. So, now, we’ll talk about the Office action that one receives due to the rejection of patent, which can be there because of the errors in documentation, description, language, translations, and a major due to the defect in the drawings and a non-professional and non-technical approach to watch the drawings.
First page of Office Action Form
So, have you have an Office action form, for example only, an invitation to correct the defects by PCT? So, let me give a brief view of the layout of an office action form. Now, as we can see, it is based on the rules defined by PCT guidelines that are article 3, 4, and rule number 26, to be precise. That can be different for different offices or different countries.
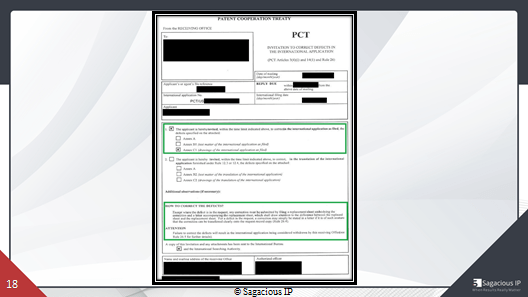
It involves an address that belongs to the applicant, a file reference number assigned to the applicant, the application number, mailing date, filing date, the defined limit for the applicant to respond to the rejections before filing them again, and the name of the applicant. Any point that has not been followed as per the guidelines, set by offices, can be seen with a crossed-mark box against it.
And, drawings being the universal language of understanding and the most important thing to keep in concentration while filing and violating these guidelines are showing non-professionalism towards them and lead a patent towards rejection and consequently, towards higher expense and wastage of time. So, here I have highlighted the box which shows us the reason of rejection and, as you can see, it is due to the defects in drawings that have been filed like most of the other office actions.
Now, going down with the form rest inputs the iris of the receiving office and the name and the contact details of the examiner. This was the first page of an invitation form to correct the defects or an Office action. So, let me show you the second sheet of this rejection form.
Second page of Office Action Form
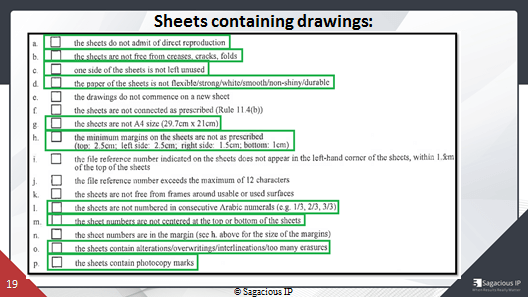
So, as I mentioned earlier, that an objection can be due to many reasons for violating the guidelines. This particular office action includes the rejection based on the physical requirements, which involves drawing and sheets which are containing the drawings. So, let’s go with the sheets containing the drawings first. These rejection points or rules, can be different for different judiciaries. So, we will be discussing only those, which acts universally and are common to most of them and also are the most neglected ones.
I have highlighted a few of them here, let’s go through them quickly as some have already been discussed and described by Hemant during the first half of our session. So, with this, we have our first point which might get rejected if you reproduce the sheet directly. So, it is required to not use the sheet which you have used for basic, a rough idea drawn to it for filing, as it can lead to rejection.
Point B, also be questioned if she just having any kind of distortion, because when you are filing a patent through drawings, the sheet should be free from any falls, a crease on any kind of damage.
Rejection point C, will have an objection, if we have any unnecessary mock or text over the size of the sheet, which does not have a drawing on it. So, the side containing drawings should be blank in order to avoid any rejection.
Similarly, point D questions the strength of the sheet, as sheet submitted for filing, should be strong enough to withstand several copies and other handling. I guess objection G, has already been discussed regarding the size of the sheet, which should be A4 in all cases, unless it is required to have them in letter size by certain countries.
The question regarding the margins in edge sometimes also lead to an office action that drawing should be kept in sheets with margins as defined by the guidelines like it should be 2.5 centimetre from the top, 2.5 centimetre towards the left, 1.5 to the right, and 1 centimetre from the bottom.
Next, the objection point, i, says that you will get an Office action if the numbers are not in consecutive way. So, numbering of sheet also sometimes become a big reason of rejection which can be due to not consulting the professional or experts. So, sheet should be numbered in sequence and in Arabic numerals.
Now, we have point M, which says that numbers are not centred at the top or bottom of the sheets. So, sheets having drawings should have sheets numbers in centre of the prescribed margins as per the guidelines and not in-between the margins.
Going to the last two points that are, O, N, P, which says rejection can be faced, so, if we have over-writings, erasers or any photocopy marks over the drawing. So, as stated above in point B sheet should be clean and neat, and should not have any kind of steam, overlapping intersecting lines, erasers, overwriting, or any leftover marks of photocopy.
How Drawings got Rejected and How to Get Rid of Them
Now, I will discuss about the drawings, how drawings got rejected and what can we do to get rid of it, also, as I had mentioned earlier the boxes containing drawing. I will discuss specific points due to which this patent got rejected. In the last section, here I have marked some of the points that are used by many of the country offices.
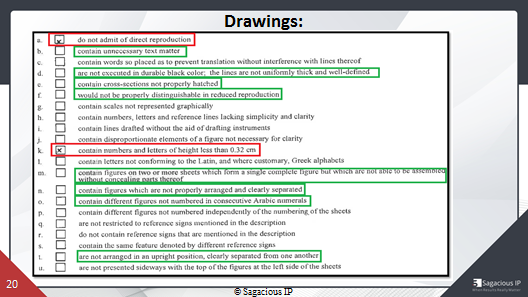
Do not admit of direct reproduction
So, we got the first one which do not admit of direct reproduction. Again, it was mentioned in the case of the sheets too, but here it has slightly different purpose, in this case, drawings should not be filed directly to the office. There should be a proper black and white line drawings, which is highly preferable by almost all of the judiciaries which can use color or grey scale pictures too, for some specific patents only, as described by Hemant. But, again, it is going to have more efforts, times, expense and the expertise.
Drawing contains unnecessary text matter
The next rejection point, which says, the sheet or the drawing contains unnecessary text matter. So, this is when patent get rejected due to carefree and non-professional approach of the applicant and ended up having an office action. The drawings should not have any unnecessary text or number that does not belong to the drawing and this is why you need a drafter who understands the draft and patent requirements.
Lines with persistent black color
The point D is also a question many times in an office action. So, this has been a reason in many of the office action, the drawing should have lines with persistent black color that should be uniformly thick in order to be long lasting and withstand with the pressure handling in several copies. It is a difficult task and it depends on the expertise of the patent illustrator who makes it precise to the requirement.
The cross-section
We have another objection point that discuss about the cross-section, so this is easy to maintain but to understand this, we need to have some visualization of the patent product in mind. When we section apart our product, it divides into number of sub-parts with their own section surfaces. These surfaces need to be shown with a hatch filing into it where different hatch patent can be used to indicate different surfaces. So, it is essential to have an expert who has this knowledge of hatch patents and how can he or she differentiate among the surfaces and the material of different parts of drawings.
Non-distinguishable drawings while reproducing
Next rejection point we have is that the drawings are not distinguishable while reproducing them again. So, this is a most important point of an objection among drawings and it keeps coping in an office action many a times, especially in patent illustrations that have complexes in minor details. In this condition, while filing a patent, the drawings are reduced to size two-thirds in reproduction, indications, such as actual size or scale 1*2 are not permitted on the drawings since it will lose their meaning when the reproduction in a different format.
Difficult to differentiate claimed and unclean portions
In most of the design cases, it makes it really difficult to differentiate between the claimed and unclean portions and this causes a to and fro rejection of the patent. A patent illustrator is capable enough of preparing those drawings with fineness, without compromising with quality and claim of the patent product.
Another point that we used to see a lot in an office action form, that is, it contain numbers and letters, less than 0.32 cm. As we can see that this patent got rejected due to this, as it has crossed mark against this point. And, as Hemant has already described the size of the text that we use in patent illustrations in detail, you almost have an idea of how it works.
Maintain a constant size
Although, it seems much easier to maintain a constant size but this is among the most rapid reason to receive a rejection as it is essential and important to know which text to be kept and which not. Sometimes, the part involving the text is too small or too large, that it becomes really difficult to go by the standards. For getting it approved you will need an assistance of an expert of drawings.
Next, we have the rejection point K, which is regarding the figures which we are assembling in a single sheet, which cannot be assembled while joining together and doesn’t make up a single figure. So, sometimes a figure is difficult to keep on a single sheet. It happens mostly in flow diagrams, piping and instrumentation diagram, electrical circuit, and many more. So, in order to make them ready for filing, one must know how they can be split into different sheets by drawing connections among the parts of figures that it can be seen as a single figure when assembled.
Figures are not properly arranged and clearly separated
Going down the slide, I have another objection coin that contain figures which are not properly arranged and clearly separated. This becomes an issue when you try to keep many figures into one sheet, it makes the drawing messy and difficult to recognize the actual claims or essential details while reduce prediction as discussed in point F.
So, point O is certain point that can be questioned in office action as discussed earlier in the session by Hemant that figures are not numbered in consecutive Arabic numerals. This is same as the sheet numbers that we have discussed in previous section of the sheets containing the drawings. Similar to that, it is essential to keep all figures in sequence to avoid any objection.
Drawings not arranged in upright position
The last point, T, it is said that the drawings are not arranged in upright position, clearly separated from one another. In patent drafts, the figures are used to keep an upright position whether they are in cock-trait sheet or in a landscape sheet. Orientation of sheet can also lead a patent towards the rejection. So, these were the points that can cause a patent rejection and as I said earlier, that these were some of the common requirements that can be considered by most of the countries.
Satisfactory Reproduction
With this, let’s proceed to the next section, which is Satisfactory reproduction. Satisfactory Reproduction ensures that this patent is fit enough to be filed as per the PCT guidelines, it depends on the rule number 11 and 26 of the PCT system. These rules and points can be different for different countries, or maybe, they have similar rules, but with different approach or different rule numbers. And, we’ll be only discussing the ones which are common among all.
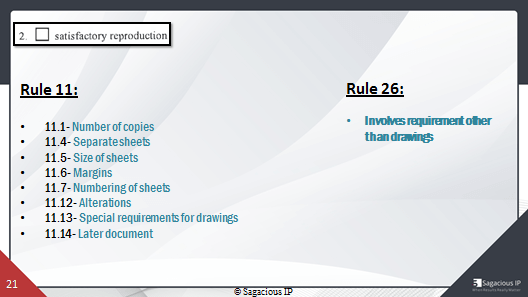
Many of the points have already been discussed throughout the presentation. So, this section can be taken as a short summary of all requirements, with some additional information. This section includes the rule number 11, which involves the instructions, mostly about the drawings or other factors that are related to drawings and rule number 26, which involves other documentation that should be kept in concentration while filing a patent.
So, let’s get ahead with rule 11, which is for the sub-categorized in some rules that are 11.14, and so on. So, get stuck with 11.1. It is as described by Hemant, that earlier through the list that different judiciaries have different guidelines regarding the number of copies to be submitted while filing.
Moving to the 11.4, this is the point that we have discussed in last section, each element, each request, description, claims, drawings, abstract of the international application, should commence on a new sheet and all sheet of an application should be so connected that they can be easily turned when consulted and easily separated and joined again if they have been separated for reproduction purpose. 11.5, 11.6, 11.7, these are some points that have already been covered in our previous sections, and should be taken care of while filing patent application.
Now, we have 11.12, that is alterations, this includes much of the data that it suggests that each sheet should not have any alterations, overwriting, intersection of lines and non-compliance with this rule may be authorized if the genuineness of the content is not in question and the requirement for good reproduction are not on state.
Going further on 11.13, this is a vast topic, special requirements for drawings. It involves all the factors in a drawing that can be responsible for an approval or rejection of a patent, some of these are drawings with durable, black, sufficiently dense and dark uniformly thick and well defined lines and strokes without coloring. Cross-sections indicated by oblique hatching should be clear numbers, letters, reference lines should be neat and as part of the standards, etc.
Going by the next sub-rule that is 11.14, which is later document and this will be the point that we haven’t discussed earlier, so it is important. This response must include the corrected drawings with replacements sheets. So, what is replacement sheet? It is when the figures with the defects are replaced by the amended ones. In this, we must avoid adding any new matter to the patent. We can add any figure, any part or any other amendment, only if it has been asked in office action, otherwise, it can cause another rejection.
Now, rule number 26, it mostly revolves around other factors like other than the drawings like invitation form, time limits and many other factors that can be responsible for rejection, but not drawings. So, these were the universal point to be considered by different countries.
Let’s slip on to the next section, which indicates further observation by the examiner. It says figure 23 and 24, the text is too small on some of these drawings. So, as we know that it is a part of the office action that we are using as a case study, for example, here it is important to understand that it is not always necessary that all the amendments have been mentioned in an office action by the examiner or making the modification can ensure that your drawings are good to go for the filing purpose.
As there are certain points or instructions in the office action which involved their effect on some or other figures. It can be the projection of the parts throughout consistency in the drawings, requirement of the product, alteration in the claim of the product, other standards as per the guidelines of different judiciaries and many more.
So, it is not only advisable to consult a professional drawing expert, but it is an essential requirement to take help of a patent illustrators who can match all the standards and guidelines as stated by different countries offices with the use of his or her expertise, experience and knowledge of the latest software to reduce the time, effort, high expenses of the rejection. So yeah, that’s all from my side Nick, hope you all get feasible answer of your questions. Over to you Nick.
Nick: Thank you, Ankur. Thanks for those elaborate coverage on how effectively deal with the rejections and how one can correct those defects in an office action. I sincerely appreciate your efforts and the coverage, especially on the coverage that you put in respect to the rule number 11 and rule number 26, which involves instructions for preparing the drawings and other factors and I’m sure that our audience will also appreciate the measures presented by you and Hemant and the way you have simplified things.
It’s definitely going to help the person even with the non-technical background regarding the same. I sincerely appreciate your help and if I can ever return the favour don’t hesitate to ask. I see that our audience have some questions for both of you. We will take them here.
Question Answer
So, first question that I have from one of our participants today is for Hemant, What could be the best software to do the patent illustrations?
What could be the best software to do the patent illustrations?
Hemant: Surely, Thank you for that question, as it is really important to use these tools, or software to ensure the smooth, swift and accuracy in the patent illustrations. Though, there are many application that we can use to make the drawings real, however, in our opinion, we can use AutoCAD for the ease of user. There are other applications as well like we have Adobe Illustrator, we have CorelDRAW. We have 3-D application as well, like, solidworks and CREO. So, the most preferred for me which I would suggest is AutoCAD.
Nick: Thank you, Hemant. Thank you so much. I hope that answers well to the participants. Next question that I have from the audience is for Ankur, Ankur could you please give us an understanding on how many figures are basically allowed in one single page?
How many figures are allowed in one single page?
Ankur: Yeah, Thanks, Nick. I really appreciate that question, as there is a reason to many of the Office actions. Although, there are no such guidelines regarding how many figures should be there in a sheet but increasing the number of figures on one sheet will only going to reduce the quality of the grains, and will be going to make it difficult while reduced reproduction.
As I already mentioned and discussed in previous slide of office action that while reducing the size of the drawings, it will make it difficult to distinguish between the claimed, unclaimed, portions and further lines and the portions, which are required to be claimed in an office action while filing. So, it totally depends on one person, that you understand, that you can use a number of drawings on a sheet, maybe maximum to two of them, but it should not degrade the quality of their drawings, or of the patent illustrations, thank you.
Nick: Thank you so much, Ankur. That was a definite answer to a definite question. So, the next question that I’ve from the audience today is for Hemant again. So, could you please give us a little understanding of whether the surface shading is mandatory in the design pattern or do we’ve some other options?
Is surface shading mandatory or is there any other option for design patents?
Hemant: Yeah. Thanks, Nick. Thanks for the question and this is an important one to understand that there are some offices where shadings are mandatory like USPTO, PTO, WIPO and many more, but some of the jurisdictions for example, China doesn’t allow the shadings. So, before moving further, one should consult professional before filing any design patent application to avoid any rejections related to the shadings or maybe related to the consultancy as well. Thank you.
Nick: OK, that’s a good one. One last question from the audience that we have because we’re running out of time. So, one last question from the audience is regarding the Indian context, Is there any specific header or footer requirements for the drawings in the Indian Patent offices?
Is there any specific header or footer requirements?
Ankur: Yes, Nick. In India, we have different guidelines for header and footer which can be included inside the margins area. Again, I’m reciting it that we can include the header and the footer information inside the marginal area, not like the USPTO and other international PCT filing where this information should kept outside the margins area. I hope I’m able to answer.
Nick: Yes, so that’s basically, depending on the guidelines laid down by the respective patent offices. So, thank you so much for that information. Now that it has been a good session with you two, regarding question and answer and considering that we are running out of time, I see that we can answer the rest of the questions on separate remarks by sharing the presentation with the attendees.
This has really been a wonderful session for all of us. If I had not received this information from you two, I would have never been able to know about the base for preparing rejection-proof patent illustrations through a much effective explanations. And I’m sure our listeners have great takeaways from this session today and they’ll be able to use several of these pointers when working on formal patent illustrations for their businesses.
I’m afraid, as I said, we haven’t been able to cover all the questions that we receive from the audience, because of the time-runs. Those which cannot be answered will be covered in the write-ups which we published after this webinar. Thank you, both of the speakers for giving us your valuable time today and the listeners and the audience for blocking your calendars for this session today. I really appreciate that.
And, once again, I would like to announce, as I mentioned earlier, Sagacious is offering up to four patent illustrations at no cost to the attendees. This offer is valid for a single or initial request only by the participants of this webinar. If interested, participants of this webinar can drop us, an e-mail, at webinars@sagaciousresearch.com. Thank you, have a wonderful day ahead, take care.